UV DTF transfer offers vibrant color and durable wear for apparel and accessories. This guide walks you through how to apply UV DTF transfer step by step, sharing practical tips, recommended temps, and common pitfalls to avoid. Whether you are printing on cotton, blends, or polyester, understanding the UV DTF transfer process helps you achieve crisp edges and consistent results across batches. You will master UV DTF transfer steps, including design, printing, sealing, and heat pressing, while paying close attention to the DTF transfer heat press temperature. With the right materials and technique, your designs will stay bright and durable through many washes.
This modern printing approach uses UV-curable inks on a printable film, which is subsequently transferred to fabric. It merges the adaptability of direct-to-film with the color accuracy of UV inks, delivering sharp edges and vibrant tones on cotton, blends, and poly fabrics. For designers printing tee shirts, bags, or uniforms, understanding the UV workflow helps you choose the right method for your project. Compared with standard DTF and other transfer techniques, this method offers precise details and stronger wash durability when applied with proper heat and timing.
Understanding UV DTF Transfer: What It Is and Why It Shines
UV DTF transfer represents a modern approach to decorating fabrics by using UV-curable inks printed on a specialized transfer film. This method blends the flexibility of traditional DTF with the color accuracy and sharpness of UV inks, delivering vibrant designs on cotton, blends, and poly fabrics. By understanding the UV DTF transfer workflow, you can consistently achieve crisp edges, high color fidelity, and durable results across batches.
The appeal of UV DTF transfer lies in its ability to produce bold graphics with clean lines and limited ink bleed. Designers benefit from a wider color gamut, smoother gradients, and a more forgiving process when aligning artwork on garments. This section sets the stage for practical application, including how to prepare artwork, select suitable fabrics, and anticipate color behavior under heat and pressure.
UV DTF Transfer Steps: A Clear Path from Design to Finished Print
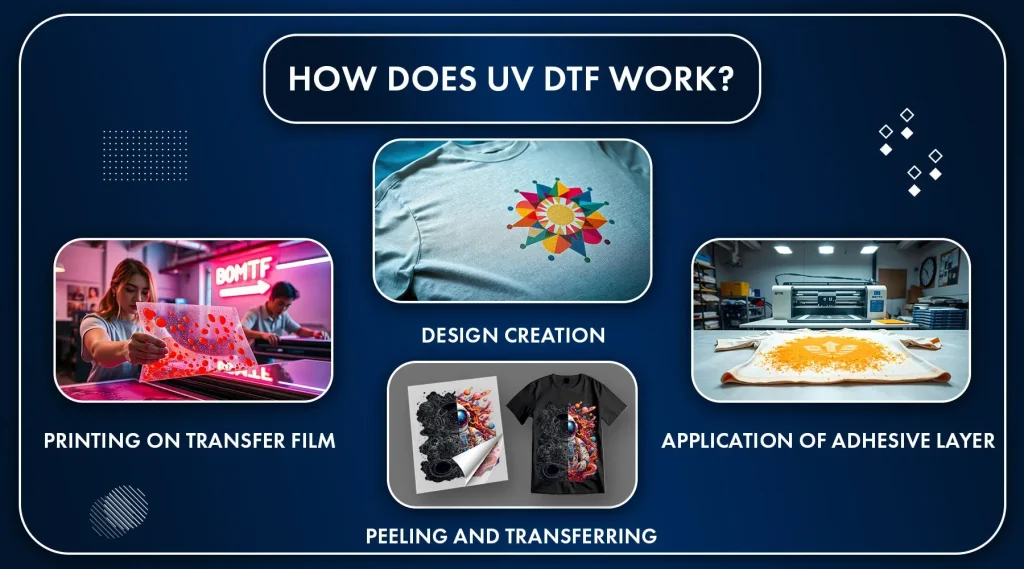
This subheading outlines the core UV DTF transfer steps as a practical workflow you can follow from concept to completion. Start with designing at high resolution to fit the garment size, then print onto UV DTF film using appropriate white underbase when needed for dark fabrics. Saving artwork in a color-managed workflow helps preserve accuracy and ensures the UV DTF transfer steps stay consistent.
Next comes sealing or drying, garment preparation, alignment, pressing, and finally peeling and finishing. Each step benefits from steady temperature control and careful handling to prevent color shifts or misalignment. By following the UV DTF transfer steps in a structured way, you reduce errors and improve repeatability across multiple prints.
How to Apply UV DTF Transfer on Different Fabrics and Surfaces
Applying UV DTF transfer successfully depends on fabric type, pre-treatment, and the transfer film’s instructions. Light or white fabrics typically showcase color most vividly, while blends and poly fabrics require mindful moisture management and pre-press to flatten the surface. This section guides you through fabric selection, pre-press timing, and how to adapt pressure for different textile textures.
Alignment and adhesion are critical for a clean result. Use heat-resistant tape to secure the film and double-check seams, edges, and text orientation before pressing. Understanding how to apply UV DTF transfer across cotton, blends, and poly fabrics helps you optimize results and reduces the chance of edge lifting or color misregistration during heat application.
DTF Transfer Heat Press Temperature Guidelines for UV Inks
When working with UV inks, following precise heat press temperature guidelines is essential for durability and color integrity. A common range for many UV DTF transfers is around 160 to 170 C (320 to 340 F) for about 10 to 15 seconds, with medium to firm pressure. Always consult your specific film’s instructions, as some formulations may require adjustments.
Keen attention to dwell time and even pressure helps prevent hotspots that can dull colors or cause edge blurring. Some fabrics benefit from a second, shorter press after peeling a portion of the film, while others may require a single long press. Consistency in temperature and pressure across batches is a key factor in achieving uniform results.
UV DTF Transfer Tutorial: From Artwork to Post-Print Care
This subheading walks through a practical UV DTF transfer tutorial, covering everything from design to final care. Start with a vibrant, print-ready design and proceed through printing, sealing or drying, garment pre-press, alignment, pressing, and peeling while maintaining a color-managed workflow. The goal is to preserve color depth and edge sharpness while minimizing distortion.
After peeling, some films require a post-cure or additional warm press to maximize wash durability. Always verify curing times and follow the supplier’s guidance for post-curing steps. Proper care afterward—washing cold, inside-out and using gentle detergents—helps extend the life of the print and maintain vibrancy across multiple washes.
Troubleshooting Common Issues in UV DTF Transfers and How to Fix
Even with careful preparation, common issues can arise during UV DTF transfers. If colors aren’t vibrant enough, recheck the white underbase on dark fabrics, confirm full cure, and ensure the garment was pre-pressed properly before transfer. Addressing these factors helps restore brightness and edge fidelity.
Edge problems, ghosting, or color bleed often point to alignment errors, incomplete adhesion, or improper heat timing. Verify there is no air between the film and garment, re-tape as needed, and ensure the transfer is flat with uniform pressure. Following the UV DTF transfer tutorial with attention to these details will help you troubleshoot efficiently and reduce repeats in production.
Frequently Asked Questions
What are the UV DTF transfer steps?
The UV DTF transfer steps are: Step 1 design and print; Step 2 seal and dry; Step 3 prepare the garment; Step 4 align and tape; Step 5 press temperature and time; Step 6 peel and finish. Some films may require a post-cure step per the supplier. Following these UV DTF transfer steps helps ensure crisp edges and durable results.
How to apply UV DTF transfer correctly?
To apply UV DTF transfer correctly, print a high-resolution design on UV DTF film, then prepare the garment with a brief pre-press. Align the transfer with heat-resistant tape, and press at about 160–170 C (320–340 F) for 10–15 seconds with even pressure. Peel while warm or as directed by the film, and allow any required cure time for best wash durability.
What is a UV DTF transfer tutorial?
A UV DTF transfer tutorial is a practical, step-by-step guide covering design, printing, alignment, pressing, peeling, and curing for UV DTF transfers. It helps you choose materials, set temps, and avoid common pitfalls to achieve consistent, vibrant results.
DTF transfer heat press temperature: what should I set?
DTF transfer heat press temperature: For most UV DTF transfers, set the press to about 160–170 C (320–340 F) for 10–15 seconds with medium to firm pressure. Always follow the film manufacturer’s guidelines because some films require different temps or times. If needed, perform a second shorter press per the film instructions.
What are common issues when applying UV DTF transfers and how can I avoid them?
Common issues in UV DTF transfers and how to avoid them include: color not vibrant enough (check print brightness and ensure proper curing), edges not crisp (verify resolution, alignment and even pressure), ghosting or double images (keep film flat and taped, remove air), peeling or cracking (correct temp and dwell time and avoid over-pressing), color bleed on dark fabrics (use an under-base as needed and test on similar fabrics), and hard-to-peel transfers (follow the film’s peel style and cooling guidelines).
How should I care for UV DTF transfers after washing?
Care and washing guidelines: wash UV DTF transfers in cold water inside-out with a gentle detergent. Air dry or tumble dry on low heat. Ensure the print is fully cured before washing and adjust heat/pressure if you notice cracking or fading in long-term wear.
| Topic | Key Points |
|---|---|
| What is UV DTF transfer | – Modern method using UV-curable inks on printable film; blends DTF flexibility with UV color accuracy; suitable for cotton, blends, and polyester; delivers sharp edges and vivid colors. – Compare UV DTF with standard DTF and other transfer methods to choose the right approach for your project. |
| Materials and setup | – Essential items: UV DTF printer or service; UV-curable inks; compatible DTF film; heat press or calendar press; pre-washed garments (light/white fabrics show colors best); optional powders/adhesives; protective papers/silicone sheets; measuring tools; clean workspace. – Notes: exact tools may vary by brand; follow manufacturers’ guidelines to avoid color shifts and misprints. |
| Step-by-step application | – Step 1: design/print – use high-res artwork; ensure white underbase for dark fabrics if needed. – Step 2: seal and dry – cure as directed; remove excess powder. – Step 3: prepare garment – pre-press 5–10 seconds. – Step 4: align/tape – secure with heat-resistant tape and verify corners/text. – Step 5: press – around 160–170 C (320–340 F) for 10–15 seconds with even pressure. – Step 6: peel/finish – warm to hot peel; re-press if needed with protective paper. – Follow-up cure if required by film supplier. |
| Common troubleshooting and tips | – Color not vibrant: verify brightness, use white underbase if needed, ensure full cure. – Edges not crisp: check resolution and alignment; use tape and even pressure. – Ghosting/double images: remove air, re-tape, ensure film lies flat. – Peeling/cracking: correct temperature/pressure/dwell; avoid over-pressing. – Colors bleeding on dark fabrics: use underbase and proper heat; run test prints. – Peel difficulty: follow film’s peel style and allow cooling if needed. |
| Care and washing guidance | – Wash cold, inside-out; gentle detergents; air dry or low heat tumble. – Proper curing and pressing improve wash durability. – If cracking or fading occurs, review curing and heat pressure for your film. |
| Advanced tips and best practices | – Plan artwork sizing, color management, and print orientation; use test swatches on similar fabrics. – Rotate designs for different garment shapes; test several samples before large runs. – Maintain consistent heating and time; save settings for future orders. – Use high-quality pre-press boards and silicone papers; keep printer/press surfaces clean. – Consider per-fabric color profiles to reduce batch variability. |
Summary
UV DTF transfer offers vibrant color and durable wear for apparel and accessories. This guide outlines the UV DTF transfer workflow, including design, printing, curing, alignment, pressing, peeling, and finishing, with tips to avoid common pitfalls. Following these steps helps you achieve crisp edges and consistent results across batches.